AdSense

Showing posts with label LINUX SECURITY. Show all posts

Tuesday, September 5, 2017

19 - Linux Security: symmetric cryptography with GPG2 and AES algorithm


SYMMETRIC CRYPTOGRAPHY WITH GPG2 AND AES ALGORITHM

- Layout for this exercise:


1 - Introduction

- Symmetric key algorithms use the same cryptographic keys for both encryption of plaintext and decryption of ciphertext. The symmetric key is a shared secret between two or more parties that can be used to maintain a private information link.

https://en.wikipedia.org/wiki/Symmetric-key_algorithm


- The Advanced Encryption Standard (AES), also known by its original name Rijndael, is a specification for the encryption of electronic data and adopted by the U.S. government and now used worldwide. The algorithm described by AES is a symmetric-key algorithm, meaning the same key is used for both encrypting and decrypting the data.

https://es.wikipedia.org/wiki/Advanced_Encryption_Standard


gpg2 is the OpenPGP part of the GNU Privacy Guard (GnuPG). It is a tool to provide digital encryption and signing services using the OpenPGP standard:

https://en.wikipedia.org/wiki/GNU_Privacy_Guard


2 - Encrypting and decrypting (locally) a text file

- The goal of this exercise is to implement a symmetric cryptography example uusing the gpg2 Linux command and the AES algorithm.

- gpg2 supports, among others, the AES algorithm with a key of 256 bits:


- Creating a text file and writing some plaintext:


- Encrypting the text file with the symmetric algorithm AES of 256 bits, a passphrase is required to be entered and reentered:


- As a consequence a new encrypted message is created with the extension .gpg:


- The content of message.txt.gpg is encrypted and the chipertext unreadable:


- Decrypting the file message.txt.gpg the passphrase is required:


- Let's confirm that the decryption has been successful because decrypted_message.txt and the original message.txt match their contents of the plaintext file:


3 - Decrypting a text file (remotely)

- Now, let's repeat the process implementing a potential real example where a remote user receives an encrypted message and decrypts it (using a previously shared key with the sender). 

- The sender (user lic at Ubuntu) uses the secure file transfer protocol SFTP to send the ciphertext or encrypted file message.txt.gpg:


- The receiver (user marie at Debian) successfully receives the encrypted message:


- As expected, the content of the encrypted file is unreadable:


- Decrypting, the remote user or receiver marie is invited to enter the same passphrase than the sender lic:


- Once the passphrase is entered, the receiver can read the plaintext:


- It is important to distinguish two concepts. On the one hand, the original plain text has been encrypted with the symmetric algorithm AES. On the other hand, the encrypted file has been sent over the network with SFTP. However, there are two levels of different encryption, while the first level refers to the content of the text file, the second level refers to the transport, communication or transfer of the file.




Friday, September 1, 2017

18 - Linux Security: system integrity checking with AIDE (Advanced Intrusion Detection Environment)


SYSTEM INTEGRITY CHECKING WITH AIDE (ADVANCED INTRUSION DETECTION ENVIRONMENT)


- Layout for this exercise:


1 - Introduction to AIDE

- AIDE (Advanced Intrusion Detection Environment) is an open source host based file and directory integrity checker that was initially developed as a free replacement for Tripwire licensed under the terms of the GNU General Public License (GPL).

 - AIDE is used on many Unix-like systems as an inexpensive baseline control and rootkit detection system. This is mainly useful for security purposes, given that any malicious change which could have happened inside of the system would be reported by AIDE.

- AIDE takes a "snapshot" of the state of the system, register hashes, modification times, and other data regarding the files defined by the administrator, building a database that is saved and may be stored on an external device for safekeeping.

- When the administrator wants to run an integrity test he places the previously built database in an accessible place and commands to compare the database against the real status of the system. In case a change has happened to the computer between the snapshot creation and the test, AIDE will detect it and report it to the administrator. 

- Also AIDE can be configured to run on a schedule and report changes daily using scheduling technologies such as cron.

https://en.wikipedia.org/wiki/Advanced_Intrusion_Detection_Environment


2 - Installing and configuring AIDE

- Installing AIDE that is available by default in the Ubuntu repository:


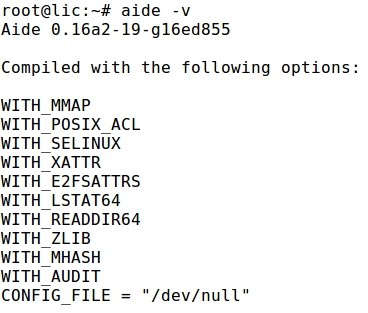
- Verifying the AIDE version:


- The configuration file is located into the /etc/aide directory


- The database is located inside /var/lib/aide. At this initial moment it is empty:


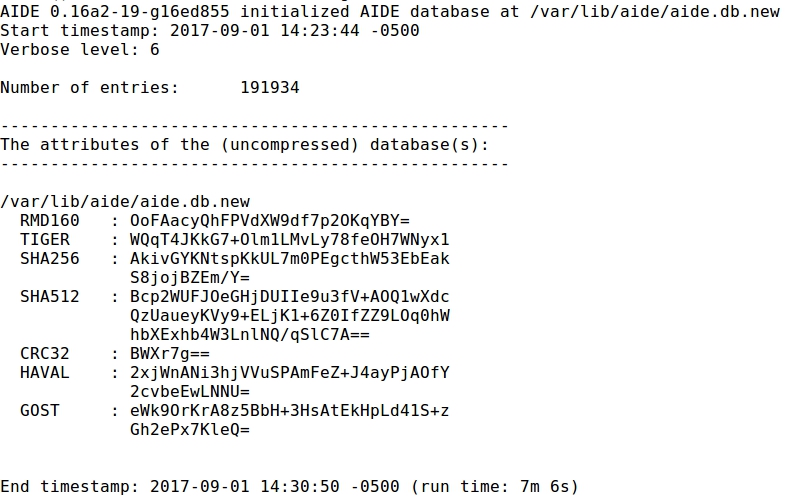
- Initializing the database with aideinit:


- A new database has been generated that must be installed :


Building a new AIDE configuration file:


Copying the new configuration file to the /etc/aide directory:


3 - Making some changes to the system

- With the purpose of checking the proper functionality of AIDE let's make some changes to the system.

- For instance creating a new directory and file:


- Also, installing new applications like SSH:


- Starting the SSH daemon:


- By default, the directive for SSH root login is set to "prohibit-password":


- Modifying sshd_config to set that directive to "yes":


4 - Testing AIDE

- Finally, running AIDE let's see if those changes to the system are detected:


- Because the output is huge let's just focus on some of the most noticeable lines provided by AIDE.

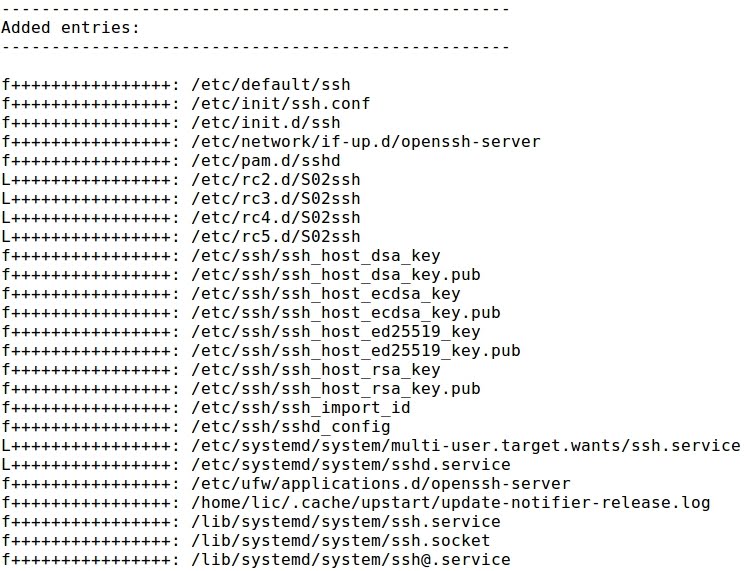
- There are some entries related to installing SSH service and changing configuration:


- Entries related with starting the SSH service:


- Also, there are entries related with the newly created  directory and file:


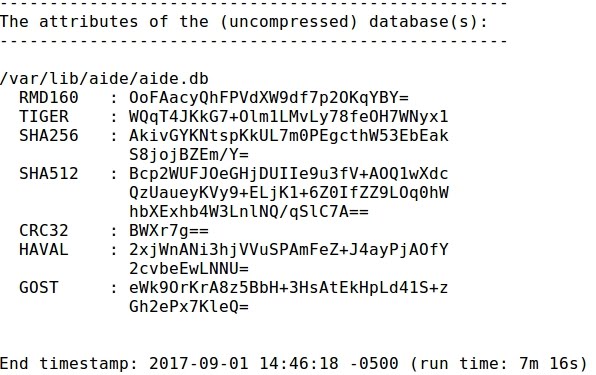
- The AIDE checking ends up with information about the new database, timestamping that it has been run for 7m 16s:


17 - Linux Security: system auditing with Audit Daemon (AuditD)


SYSTEM AUDITING WITH AUDIT DAEMON (AUDITD)

- Layout for this exercise:


1 - Introduction to AuditD

- The Linux Audit Daemon (AuditD) is a framework to allow security auditing events on a Linux system by keeping record of system events and also reporting capabilities.

- auditD can track many event types to monitor and audit the system. For instance:
  • audit file access and modification
  • see who changed a particular file
  • detect unauthorized changes
  • monitoring of system calls and functions
  • detect anomalies like crashing processes
  • set tripwires for intrusion detection purposes
  • record commands used by individual users

- auditd is the userspace component to the Linux Auditing System. It's responsible for writing audit records to the disk. 

- Viewing the logs is done with the ausearch or aureport utilities. Finding the related event or access to the file can be quickly traced by using the ausearch tool.

- The audit daemon itself has some configuration options that the admin may wish to customize. They are found in the auditd.conf file.

- Configuring the audit rules is done with the auditctl utility. During startup, the rules in /etc/audit/audit.rules are read by auditctl. 

- Configuring options for auditctl:

-f: leave the audit daemon in the foreground for debugging. Messages also go to stderr rather than the audit log.
-l: allow the audit daemon to follow symlinks for config files.
-n: no fork. This is useful for running off of inittab
-s=ENABLE_STATE: specify when starting if auditd should change the current value for the kernel enabled flag. Valid values for ENABLE_STATE are "disable", "enable" or "nochange".

- By defining the path option, we instruct the audit framework what directory or file to watch for. 

- The permissions determine what kind of access will trigger an event. Although these look similar to file permissions, note that there is a important difference between the two. 

- The four options are:

r = read
w = write
x = execute
a = attribute change


2 - Installing and configuring auditd

- Installing auditd and related plugins and dependencies:


- Manual for auditd:


- Checking that auditd service is active:


- At this initial moment there is no rule added to auditd:


3 - Adding a rule for /etc folder configuration

- Adding the rule (-w=write over /etc with parameters read, write, execute, attribute change):


- Listing the rule:


- Now, let's modify the /etc folder by creating a new text file:


- ausearch is a tool that queries the auditd logs based on events. In this case, the parameter (-f /etc/) indicates to search for an event based on the given filename (-f):


- The user id corresponds to the root:


4 - Making rules permanent after restarting auditd service

- One of the issues with auditctl is that changes to rules are not permanent and will go away whenever the audit service is restarted. 

- To avoid this circumstance the file /etc/audit/rules.d/audit.rules must be edited.

- Restarting the service:


- Now the rule is gone after the restart:


- Editing the audit.rules configuration file by adding a rule:


- Restarting the service auditd:


- However, now the rule is still there:


5 - Adding a rule for the SSH service

- Adding a new rule for the SSH service:


- Listing the current rules:


- Editing the SSH configuration file, the current permission root login is set to "yes":


- Replacing the PermitRootLogin directive value to "no":


- Searching with ausearch the command nano used over the sshd_configuration file is found:


- As expected the user ID corresponds to the root: