AdSense

Showing posts with label IoT RASPBERRY PI. Show all posts

Thursday, March 8, 2018

Pentest via cellular network (I): Global IoT SIM Card


PENTEST VIA CELLULAR NETWORK (I): GLOBAL IOT SIM CARD

- Layout for this exercise (Smartphone and Raspberry Pi / SIM card / Modem):


1 - Introduction

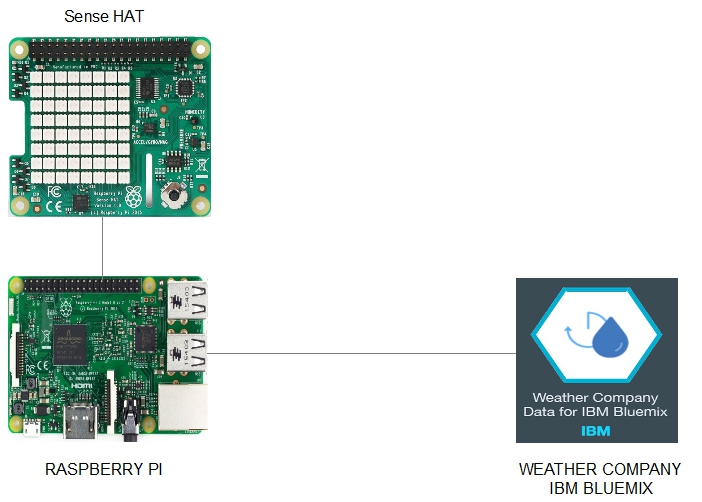
- The goal of this series of five exercises is to demonstrate how to perform a remote penetration testing (port scanning) with a Raspberry Pi device and a modem using an SMS (Short Message Service) message via a cellular network, instead of an usual Internet connection.

- For that purpose a smartphone communicates with a SIM card incorporated to a modem that is inserted into the USB port of a Raspberry Pi 3 Model B device.

- This project could be applied in scenarios where no reliable connectivity to the Internet is available, since cellular networks ensure connectivity at all times and in any place.

The project is presented through successive steps, beginning with the introduction of the hardware elements used, and continuing with the applications and programming needed to complete it.


2 - Raspberry Pi 3  with Raspbian Stretch


- As said before, in this exercise a Raspberry Pi 3 Model B device is used, loaded with the operating system Raspbian Stretch:

https://www.raspberrypi.org/products/raspberry-pi-3-model-b/


3 - Hologram Global IoT SIM Card


- Hologram is an USA based company that provides flexible tools for securely connecting IoT devices: 

https://hologram.io


- The Hologram IoT SIM platform sells the Global IoT SIM Card


https://hologram.io/store/developer-global-iot-sim-card


The Global SIM Card can be bought online at a price of $5 and it is delivered to home via the usual postal service:


- Once the SIM Card is available an online activation is required. 

- To activate the SIM card, first of all a Hologram account must be created:

https://dashboard.hologram.io/account/login


-  Once logged in, from the Dashboard the SIM is activated by first time:

https://dashboard.hologram.io/activate


- The SIM number is written on the back of the card and it must be entered (added) as below:


- Starting with the Developer data plan:


- Taking Zone 1 for the USA:


- The cost is $0 for the first month:


- Activating the card:


- The activation takes some minutes until the card reaches the Live status:


- Setting the name whitelist to the device:


- Regarding the Billing, some money should be added to the balance for later buying the number of the phone, that will be necessary for sending/receiving SMS messages:


- After some money is in the balance, a phone number can be purchased at a cheap price of $1:


- A phone number is achieved, linked to the recently activated SIM card:


Sunday, August 20, 2017

IBM Bluemix: checking the UltraViolet Index with Raspberry Pi / Sense Hat connected to IBM Weather Company Data


IBM BLUEMIX: CHECKING THE ULTRAVIOLET INDEX WITH RASPBERRY PI / SENSE HAT CONNECTED TO IBM WEATHER COMPANY DATA

- Layout for this exercise:


1 - Creating an instance of Weather Company Data IBM services

- The goal of this exercise is to build an Ultraviolet (UV) rays indicator using a Raspberry Pi device with Sense Hat and NODE-Red accessing the Weather Company Data IBM Bluemix.

- Signing into an IBM Bluemix account:


- Going to Catalog and searching for "Weather" the result is Weather Company Data:


- Weather Company Data is a service that allows the integration with IBM Bluemix:


- This service has a great range of features related with weather forecast, for instance Current Conditions provides data about UV Index:


- Clicking Create:


- Some Service credentials are generated that must be written down for later usage:


- Copying to the Clipboard the Service Credentials:


2 - Creating a NODE-Red flow

- Installing additional NODE-Red nodes necessary for accessing IBM Weather Company Data for Bluemix:


- Starting NODE-Red:


- Now, a NODE-Red flow must be created composed of 6 nodes:

1) Inject


- The payload of the inject node is the geo position (latitude and longitude) of the location of New York City:

http://mygeoposition.com/


- Entering as payload the Latitude and Longitude of NYC:


2) Weather Insights


- Entering Username and Password obtained at point 1 (Service credentials) and Current Observations as a Service:


3) Function


- The function node uses JavaScript code to process the payload coming from the previous node weather insights.

- Editing the node, the conditional statements (if ... else) are based on the Colour Index Scale provided by the United States Environmental Protection Agency.

- Also, when an "off" payload is injected the Sense Hat LED is turned off (we''ll see in next nodes):


https://www.epa.gov/sunsafety/uv-index-scale-1


4) Sense Hat


- This node corresponds to the Sense Hat module, and no special configuration is needed aside from giving a name (LED, because its color varies according to the UV Index):


5) Debug

- The Debug module displays the output obtained from the function and the weather insights nodes:


6) Inject

- The last node injects the string "off" to turn off the Sense Hat LED node:


3 - Testing the system

- Deploying the flow:


- Starting the MyGeoLocation node:


- The flow starts working:


- The LED turns on RED because at the time of the test the UV Index at New York City is closed to 8:


- The Debug tab displays the RED value and the associated New York City's geolocation:


- To check that the test is correct let's consult another UV Index source for New York City:

http://legacy.weather.weatherbug.com


- Finally the node can be turn off: